


Unityでノベルゲームを作ろう!(第3回:画像表示編)
お疲れ様です、poppyです。本日もこちらのブログを見に来てくださりありがとうございます。
今回もUnityでアセットを使わずにノベルゲームを作るところをお見せいたします。
第3回は「画像の表示」を中心に、画像の配置や消去など画像に関する様々なことをやっていきたいと思います。
制作環境
制作環境は第1、2回と同様です。また、変数についても第1、2回のものを使い回すのでご注意ください。
- バージョン:2022.3.24f1 (日本語化パッチ適用済み)
- テンプレート:Universal 2D
- スクリプト:Visual Studio 2022 (Windows)
今回は「宴」などのアセットは用いませんのでご了承ください。(多分使ったほうが早くできるとは思うけど)
免責事項
当ブログの記載内容や情報の信頼性については可能な限り十分注意をしておりますが、その完全性、正確性、妥当性及び公正性について保証するものではありません。
情報の誤りや不適切な表現があった場合には予告なしに記事の編集・削除を行うこともございます。あくまでもご自身の判断にてご覧頂くようにお願い致します。
当ブログの記載内容によって被った損害・損失については一切の責任を負いかねます。ご了承ください。
お詫び
あくまでも実装当時のコードを掲載しております。現在はバグなどを潰すために修正を行っているため本記事とは異なるコードになっておりますが、
こちらに反映する予定はございません。大変申し訳ありません。あくまでも参考程度に見ていただければ幸いです。
今回の目標
第3回では以下のことができるようにします。
・画像の表示
・画像の配置場所、拡大率の設定
・画像レイヤーの設定
・画像の消去
画像の追加
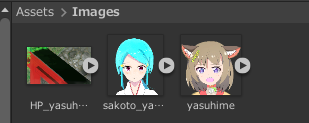
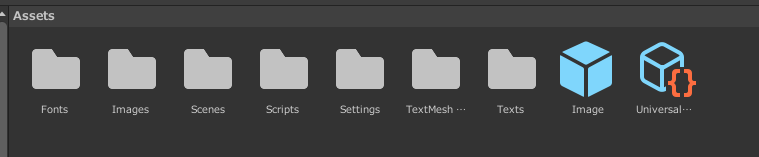
まず画像を追加します。表示させたい背景画像やイベント画像を用意します。そしてAssets上で右クリックして「作成」→「フォルダー」で新フォルダを作成します(名前をImagesにします)。そして用意した画像をドラッグ&ドロップでいれます。今回は以下のように背景画像1枚と瑳思、やすひめの顔画像を用意しました。
画像のPrefabを作る
画像についてはプレハブ(Prefab)を作ります。まずヒエラルキー上で右クリックして「UI→画像」と開き、アンカープリセットをストレッチのやつにして上下左右全て0にします。そして色を(R,G,B,A) = (255,255,255,255)にします。
その後、できたImageをAssets上にドラッグ&ドロップすると青アイコンでImageとでき、ヒエラルキーも青くなります。これでプレハブができたので、ヒエラルキーの方のImageは消しましょう。
スクリプトの作成と編集
次に画像を表示させるためのスクリプトを作成・編集をします。今後の準備のためにこの段階では使っていない変数等もありますが後々使うので許してください。
まずはScripts下でC#スクリプトから「ImageManager」を作成します。ついでに、ヒエラルキーから空のオブジェクトを生成し、名前を「ImageManager」とし、それにスクリプトのImageManagerをアタッチします。
それではImageManagerのスクリプトを記述しましょう。
ImageManager.cs
using System.Collections;
using System.Collections.Generic;
using UnityEngine;
using UnityEngine.UI;

namespace NovelGame
{
  public class ImageManager : MonoBehaviour
  {
    [SerializeField] Sprite _background1;
    [SerializeField] Sprite _sakoto_face;
    [SerializeField] Sprite _yasuhime_face;
    [SerializeField] GameObject _backgroundObject;
    [SerializeField] GameObject _eventObject;
    [SerializeField] GameObject _imagePrefab;

    // テキストファイルから、文字列でSpriteやGameObjectを扱えるようにするための辞書
    Dictionary<string, Sprite> _textToSprite;
    Dictionary<string, GameObject> _textToParentObject;

    // 各画像のGameObjectを管理するためのリスト
    List<(string, GameObject, int)> _textToSpriteObject;

    void Awake()
    {
      //テキスト→スプライトの初期化と画像の追加
      _textToSprite = new Dictionary<string, Sprite>();
      _textToSprite.Add("background1", _background1);
      _textToSprite.Add("sakoto_face", _sakoto_face);
      _textToSprite.Add("yasuhime_face", _yasuhime_face);

      //テキスト→親オブジェクト(backgroundかeventか)の追加
      _textToParentObject = new Dictionary<string, GameObject>();
      _textToParentObject.Add("backgroundObject", _backgroundObject);
      _textToParentObject.Add("eventObject", _eventObject);

      _textToSpriteObject = new List<(string, GameObject, int)>();
    }


    // 画像を配置する
    public void PutImage(string imageName, string parentObjectName)
    {
      //画像を取得
      Sprite image = _textToSprite[imageName];
      GameObject parentObject = _textToParentObject[parentObjectName];


      // 新しい画像を生成する
      Quaternion rotation = Quaternion.identity;
      Transform parent = parentObject.transform;

      // 画像のGameObjectを生成
      GameObject item = Instantiate(_imagePrefab, parent);
      item.GetComponent<Image>().sprite = image;
      RectTransform rectTransform = item.GetComponent<RectTransform>();

      // RectTransformを設定
      rectTransform.anchoredPosition = new Vector2(0,0); //アンカーポイントからの相対位置を設定
      rectTransform.localRotation = rotation; // 回転を設定

      //画像の追加(第3引数は後に使用)
      _textToSpriteObject.Add((imageName, item, 0));
    }

  }
}
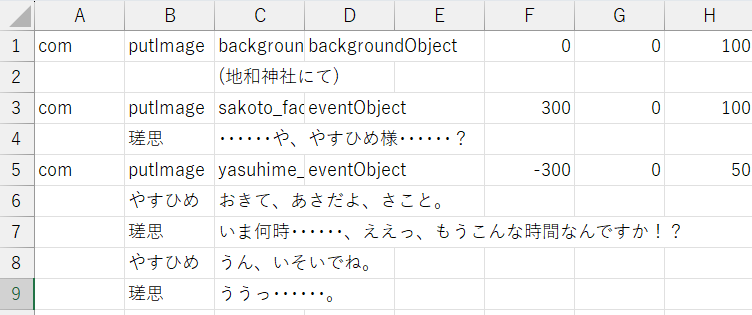
続いて、画像を表示する命令部分を作成します。具体的には「text_script.csv」で「画像を表示する」というような命令を書く→「UserScriptManager.cs」が命令を受け取り、ImageManagerに指令を出す→「ImageManager.cs」で画像処理を行う、という形になります。ではまずtext_script.csvには以下のように記述します。
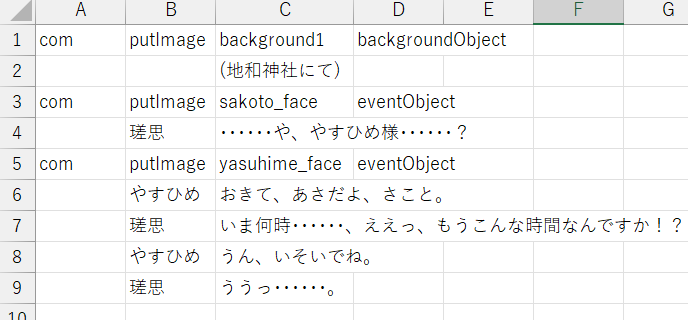
A列のcomは命令であることを意味するヘッド、B列のputImageは命令内容(今回は画像の表示)、C列はいれる画像オブジェクト、D列はその画像を背景とイベントのどっちにいれるかを決めるものとなっています。これを反映するためにUserScriptManager.csやMainTextController.csを追記します。
UserScriptManager.cs
using System.Collections;
using System.Collections.Generic;
using UnityEngine;
using System.IO;

namespace NovelGame
{
  // テキストファイルから文章を読み込み、ステートメントの実行を管理するクラス
  public class UserScriptManager : MonoBehaviour
  {
    [SerializeField] TextAsset _textFile; // テキストファイルを格納するための変数

    List<string> _sentences = new List<string>(); // 読み込んだ文章を格納するリスト
    // スクリプトの初期化時に実行されるメソッド
    void Awake()
    {
      // テキストファイルから文章を一行ずつ読み込んでリストに格納する
      StringReader reader = new StringReader(_textFile.text);
      while (reader.Peek() != -1)
      {
        string line = reader.ReadLine();
        _sentences.Add(line);
      }
    }
  // 現在の文章を取得するメソッド
  public string GetCurrentSentence()
    {
      return _sentences[GameManager.Instance.lineNumber];
    }

    // 命令文であるかどうかを判定するメソッド
    public bool IsStatement(string sentence)
    {
      string[] words = sentence.Split(','); // 文章を単語に分割する

      if (words[0] == "com") // A列目がcomの場合、命令とみなす
      {
        return true;
      }
      return false;
    }

    // 命令を実行するメソッド
    public void ExecuteStatement(string sentence)
    {
      string[] words = sentence.Split(','); // 文章を単語に分割する

      // 単語によって処理を分岐する
      switch (words[1])
      {
        case "putImage": // putImageステートメントの場合

          GameManager.Instance.imageManager.PutImage(words[2], words[3]); // 画像を表示する
          GameManager.Instance.mainTextController.GoToTheNextLine(); //次の行に進む
          break;
        default: //そうでない場合
          break;
      }
    }

  }
}
MainTextController.cs
using System.Collections;
using System.Collections.Generic;
using UnityEngine;
using TMPro;

namespace NovelGame
{
  public class MainTextController : MonoBehaviour
  {
    [SerializeField] TextMeshProUGUI _mainTextObject;
    [SerializeField] TextMeshProUGUI _nameTextObject;
    int _displayedSentenceLength;
    int _sentenceLength;
    float _time;
    float _feedTime;


    // Start is called before the first frame update
    void Start()
    {
      _time = 0f;
      _feedTime = 0.05f;

      // 最初の行のテキストを表示、または命令を実行
      string statement = GameManager.Instance.userScriptManager.GetCurrentSentence();
      if (GameManager.Instance.userScriptManager.IsStatement(statement))
      {
        GameManager.Instance.userScriptManager.ExecuteStatement(statement);
      }
      DisplayText();
    }

    // Update is called once per frame
    void Update()
    {
      // 文章を1文字ずつ表示する
      _time += Time.deltaTime;
      if (_time >= _feedTime)
      {
        _time -= _feedTime;
        if (!CanGoToTheNextLine())
        {
          _displayedSentenceLength++;
          _mainTextObject.maxVisibleCharacters = _displayedSentenceLength;
        }
      }

      // クリックされたとき、次の行へ移動
      if (Input.GetMouseButtonUp(0))
      {
        if (CanGoToTheNextLine())
        {
          GoToTheNextLine();
          DisplayText();
        }
        else
        {
          _displayedSentenceLength = _sentenceLength;
        }
      }
    }

    // その行の、すべての文字が表示されていなければ、まだ次の行へ進むことはできない
    public bool CanGoToTheNextLine()
    {
      string sentence = GameManager.Instance.userScriptManager.GetCurrentSentence();
      string[] words = sentence.Split(',');
      string textsentence = words[2];
      _sentenceLength = textsentence.Length;
      return (_displayedSentenceLength > textsentence.Length);
    }

    // 次の行へ移動
    public void GoToTheNextLine()
    {

      _displayedSentenceLength = 0;
      _time = 0f;
      _mainTextObject.maxVisibleCharacters = 0;
      GameManager.Instance.lineNumber++;
      //現在の文を定義し、それが命令文であればそれを実行する
      string sentence = GameManager.Instance.userScriptManager.GetCurrentSentence();
      if (GameManager.Instance.userScriptManager.IsStatement(sentence))
      {
        GameManager.Instance.userScriptManager.ExecuteStatement(sentence);
      }

    }


    // テキストを表示
    public void DisplayText()
    {

      //現在の文章をuserScriptManagerのGetCurrentSentenceで引っ張ってくる
      string sentence = GameManager.Instance.userScriptManager.GetCurrentSentence();
      //カンマ区切りで名前と本文をわける
      string[] words = sentence.Split(',');

      //1番が名前、2番が本文
      string namesentence = words[1];
      string textsentence = words[2];
      //それぞれテキストオブジェクトに代入する
      _mainTextObject.text = textsentence;
      _nameTextObject.text = namesentence;

    }
  }
}
さらに、ImageManagerをGameManagerの傘下にするためにGameManager.csも少し手入れします。
GameManager.cs
using System.Collections;
using System.Collections.Generic;
using UnityEngine;

namespace NovelGame
{
  public class GameManager : MonoBehaviour
  {
    // 別のクラスからGameManagerの変数などを使えるようにするためのもの。(変更はできない)
    public static GameManager Instance { get; private set; }

    public UserScriptManager userScriptManager;
    public MainTextController mainTextController;
    public ImageManager imageManager;


    // ユーザスクリプトの、今の行の数値。クリック(タップ)のたびに1ずつ増える。
    [System.NonSerialized] public int lineNumber;

    void Awake()
    {
      // これで、別のクラスからGameManagerの変数などを使えるようになる。
      Instance = this;

      lineNumber = 0;
    }
  }
}
インスペクターへの挿入
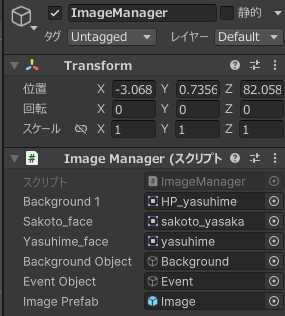
次にそれぞれのインスペクターに画像やスクリプトを挿入します。
ImageManager
- Background1 →用意した背景画像
- Sakoto_face、Yasuhime_face→用意したイベント画像(ここでは瑳思とやすひめの顔画像)
- Background Object→「シーン」から「background」
- Event Object→「シーン」から「Event」
- Image Prefab→「アセット」から「Image」
とします。
GameManager
Image Managerに「シーン」からImageManagerを挿入します。
アスペクト比の修正
これで実行するとおそらくアスペクト比にかかわらず全画面出るようになると思います。
これを回避するために、一旦AssetsのImageを開き、インスペクターのImageのソース画像に適当な画像を入れるとこのように「アスペクト比を保存」が出てきますのでチェックをいれます。

その後ソース画像を消してもう1回実行すればちゃんとアスペクト比が戻ると思います。
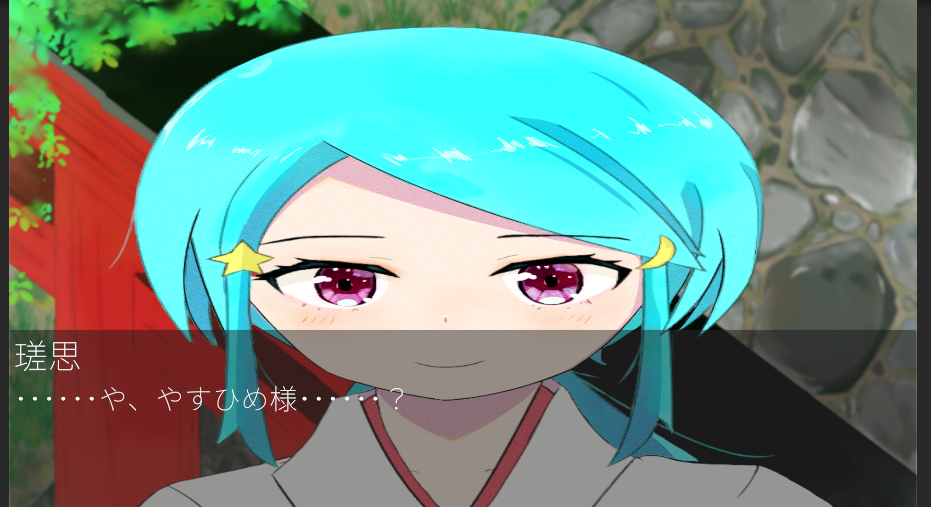
画像の位置・大きさの調整
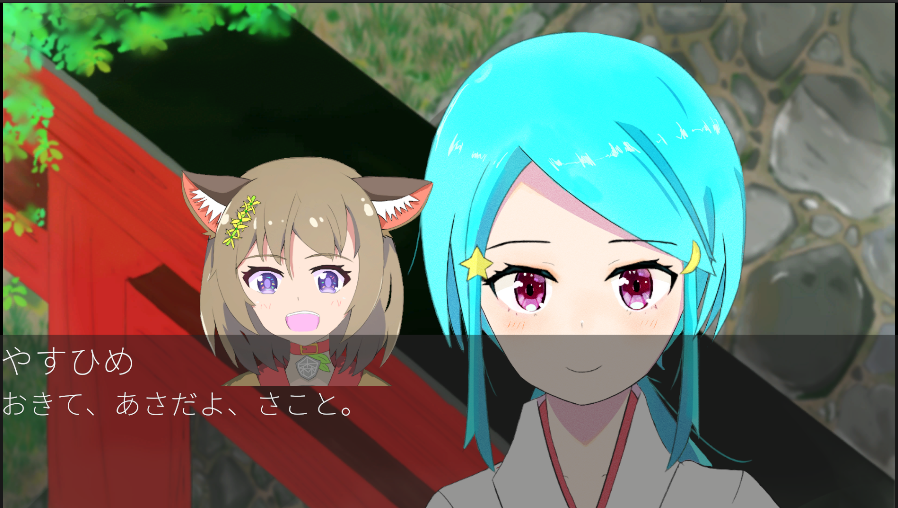
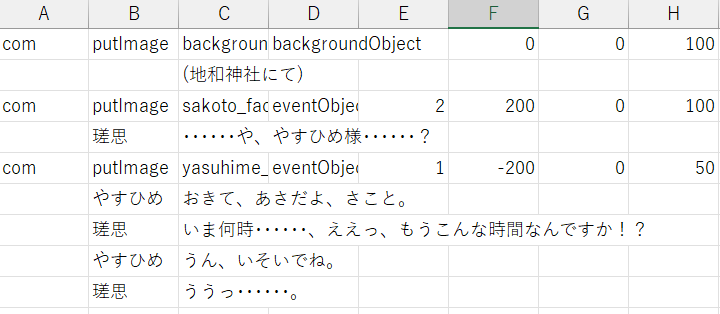
画像はこれで出せましたが、まだ位置が調整できず中央に配置しているせいで、瑳思とやすひめが重なってしまいました。中央以外にも自由に位置を配置したいと思います。また、画像の大きさも拡大・縮小できるようにしたいと思いますので、それを設定していきたいと思います。制作の都合上、E列は開けてF,G,H列にそれぞれX座標、Y座標、拡大率(100を1倍とする%表記)を書きます(E列は次に紹介するレイヤー番号に用いる)
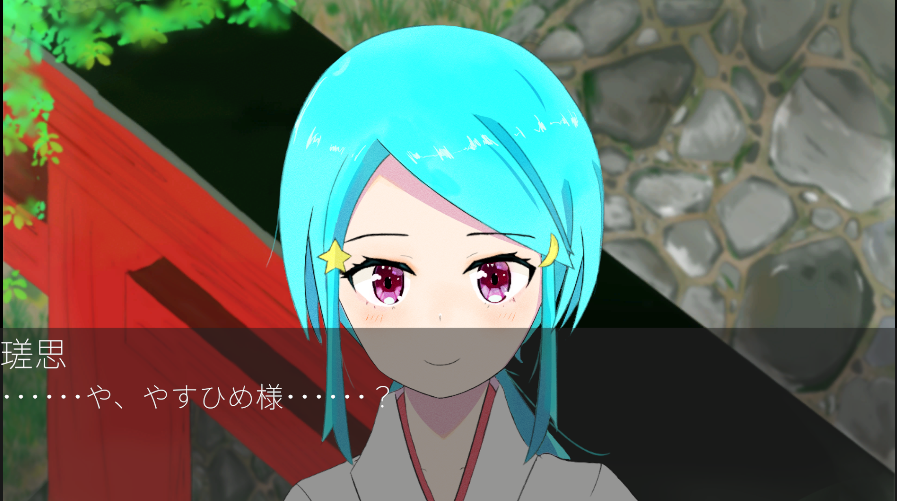
ここでは背景はそのまま、瑳思はX座標を300なので若干右に、やすひめはXが-300なので若干左、かつ拡大率が50なので50%の大きさになります。
ImageManager.cs
 public void PutImage(string imageName, string parentObjectName, int img_x = 0, int img_y = 0, int scale_percent = 100)
 {
   //画像を取得
   Sprite image = _textToSprite[imageName];
   GameObject parentObject = _textToParentObject[parentObjectName];


   // 新しい画像を生成する
   Quaternion rotation = Quaternion.identity;
   Transform parent = parentObject.transform;

   // 画像のGameObjectを生成
   GameObject item = Instantiate(_imagePrefab, parent);
   item.GetComponent<Image>().sprite = image;
   RectTransform rectTransform = item.GetComponent<RectTransform>();

   // RectTransformを設定
   rectTransform.anchoredPosition = new Vector2(img_x, img_y); // img_xとimg_yを使用してアンカーポイントからの相対位置を設定
   rectTransform.localRotation = rotation; // 回転を設定

   float scale = (float)scale_percent / 100; // 拡大率を決定
   rectTransform.localScale = new Vector3(scale, scale, 1.0f);

   //画像の追加(第3引数は後に使用)
   _textToSpriteObject.Add((imageName, item, 0));
 }
UserScriptManager.cs
// 命令文であるかどうかを判定するメソッド
public bool IsStatement(string sentence)
{
  string[] words = sentence.Split(','); // 文章を単語に分割する

  if (words[0] == "com") // A列目がcomの場合、命令とみなす
  {
    return true;
  }
  return false;
}

//文字列が数値なら数値に、そうでないならデフォルト値に設定するメソッド
private int ConvertToInt(string str, int defaultNum = 0)
{
  return int.TryParse(str, out int result) ? result : defaultNum;
}

// 命令を実行するメソッド
public void ExecuteStatement(string sentence)
{
  string[] words = sentence.Split(','); // 文章を単語に分割する

  // 単語によって処理を分岐する
  switch (words[1])
  {
    case "putImage": // putImageステートメントの場合
      int img_x = ConvertToInt(words[5]);
      int img_y = ConvertToInt(words[6]);
      int scale_percent = ConvertToInt(words[7], 100);
      GameManager.Instance.imageManager.PutImage(words[2], words[3], img_x, img_y, scale_percent); // 画像を表示する
      GameManager.Instance.mainTextController.GoToTheNextLine(); //次の行に進む
      break;
    default: //そうでない場合
      break;
  }
}
これで位置と大きさを変えることができました。以下のように瑳思が若干右に、やすひめが若干左で小さくなっていることがわかります。
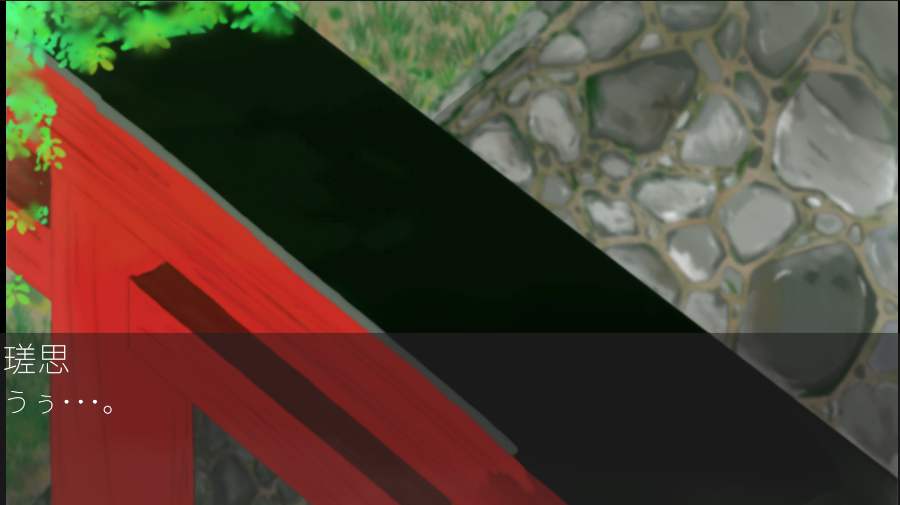
レイヤーの設定
続いてイベント画像内で「レイヤー」を定義したいと思います。現時点ですと、イベント画像は配置した画像が必ず前面に来るような仕様になっています。しかし、場合によっては後に来た画像が背面に来てほしいケースもあると思います。ここでは、レイヤー番号を設定し、レイヤー番号が大きい順に前面に来るようにするのに加え、同じレイヤー番号なら後から来た画像に上書きされる仕様(1つのレイヤーには1つの画像しかいれないようにする)ようにしたいです。なぜこうするかというと以前使っていたRPGツクールの仕様に合わせたかったからです。
まずは、先程開けておいたE列にレイヤー番号を設定します。背景画像は関係ないのでレイヤー番号を設定しません。
画像が重なるようにX座標を調整し、瑳思のほうがレイヤー番号が大きいのでやすひめよりも前面に配置されていれば良いです。
ImageManager.cs
//レイヤー番号を取得する
int getLayerNum(List<(string, GameObject, int)> Object, int layerOrder)
{
  int rank = 0;
  foreach (var pair in Object)
  {
    (string name, GameObject obj, int layer) = pair;
    if (layerOrder > layer)
    {
      rank++;
    }
  }
  return rank;
}

// 画像を配置する
public void PutImage(string imageName, string parentObjectName, int layerOrder = 10000, int img_x = 0, int img_y = 0, int scale_percent = 100)
{
  Sprite image = _textToSprite[imageName];
  GameObject parentObject = _textToParentObject[parentObjectName];

  //既存のオブジェクトがないか調べる
  GameObject existingObject = null;
  //レイヤー番号の既存のオブジェクトを検索する
  foreach (var pair in _textToSpriteObject)
  {
    (string name, GameObject obj, int layer) = pair;
    if (layer == layerOrder)
    {
      existingObject = obj;
      break;
    }
  }
  // 既存のオブジェクトがあれば削除する
  if (existingObject != null)
  {
    Destroy(existingObject);
    // リストからも削除する
    _textToSpriteObject.RemoveAll(item => item.Item3 == layerOrder);
  }


  // 新しい画像を生成する
  Quaternion rotation = Quaternion.identity;
  Transform parent = parentObject.transform;

  // 画像のGameObjectを生成
  GameObject item = Instantiate(_imagePrefab, parent);
  item.GetComponent<Image>().sprite = image;
  RectTransform rectTransform = item.GetComponent<RectTransform>();

  // RectTransformを設定
  rectTransform.anchoredPosition = new Vector2(img_x, img_y); // img_xとimg_yを使用してアンカーポイントからの相対位置を設定
  rectTransform.localRotation = rotation; // 回転を設定

  float scale = (float)scale_percent / 100; // 拡大率を決定
  rectTransform.localScale = new Vector3(scale, scale, 1.0f);


  // レイヤー番号を設定し、画像の追加、レイヤー番号通りに画像を配置
  int siblingIndex = getLayerNum(_textToSpriteObject, layerOrder);
  _textToSpriteObject.Add((imageName, item, layerOrder));
  item.transform.SetSiblingIndex(siblingIndex);

}
UserScriptManager.cs
 // 命令を実行するメソッド
 public void ExecuteStatement(string sentence)
 {
   string[] words = sentence.Split(','); // 文章を単語に分割する

   // 単語によって処理を分岐する
   switch (words[1])
   {
     case "putImage": // putImageステートメントの場合

       int layerOrder = ConvertToInt(words[4],10000);
       int img_x = ConvertToInt(words[5]);
       int img_y = ConvertToInt(words[6]);
       int scale_percent = ConvertToInt(words[7], 100);
       GameManager.Instance.imageManager.PutImage(words[2], words[3], layerOrder, img_x, img_y, scale_percent); // 画像を表示する
       GameManager.Instance.mainTextController.GoToTheNextLine(); //次の行に進む
       break;
     default: //そうでない場合
       break;
   }
 }
このようにすることで、瑳思が前面、やすひめが背面となるようにレイヤーを設定できました。
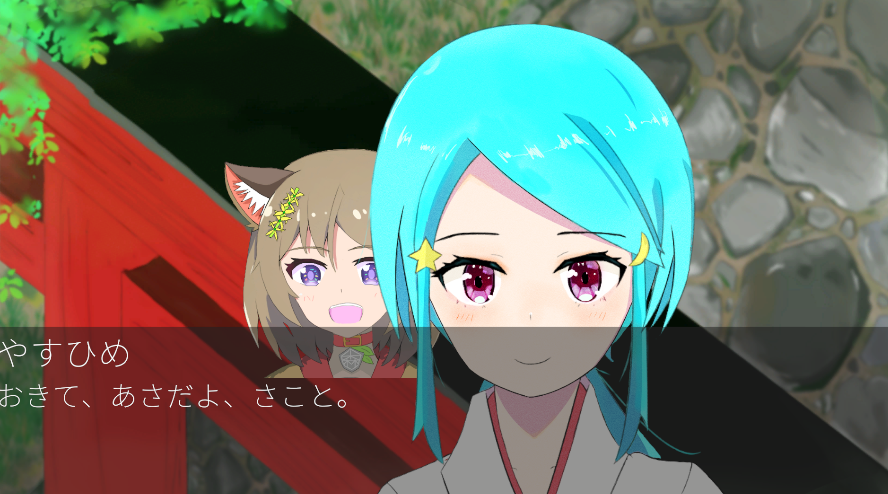
また、同じレイヤー番号を設定すると、やすひめの画像が瑳思の画像を上書きして表示されるようにもなっています。
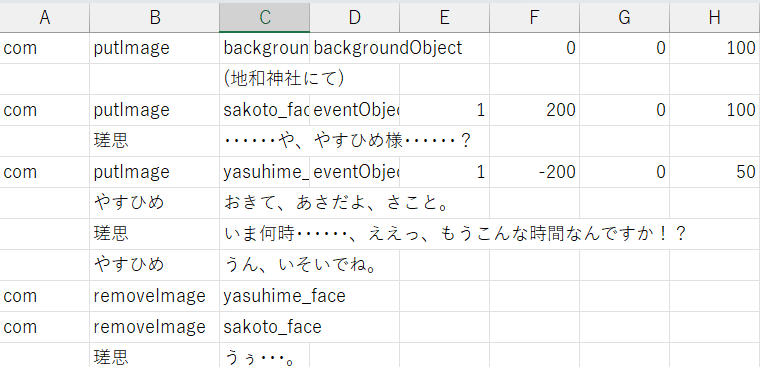
画像の消去
最後に画像の消去を行います。removeImageで画像を削除するようにします。(レイヤー番号が同じになっているので上書きされた後消えるようになってますね・・・)
ImageManager.cs
    // 画像を削除する
    public void RemoveImage(string imageName)
    {
      var existingObjects = _textToSpriteObject.FindAll(item => item.Item1 == imageName);
      foreach (var existingObject in existingObjects)
      {
        GameObject obj = existingObject.Item2;
        Destroy(obj);
        _textToSpriteObject.Remove(existingObject);
      }
    }
UserScriptManager.cs
// 命令を実行するメソッド
public void ExecuteStatement(string sentence)
{
  string[] words = sentence.Split(','); // 文章を単語に分割する

  // 単語によって処理を分岐する
  switch (words[1])
  {
    case "putImage": // putImageステートメントの場合

      int layerOrder = ConvertToInt(words[4],10000);
      int img_x = ConvertToInt(words[5]);
      int img_y = ConvertToInt(words[6]);
      int scale_percent = ConvertToInt(words[7], 100);
      GameManager.Instance.imageManager.PutImage(words[2], words[3], layerOrder, img_x, img_y, scale_percent); // 画像を表示する
      GameManager.Instance.mainTextController.GoToTheNextLine(); //次の行に進む
      break;
    case "removeImage":
      GameManager.Instance.imageManager.RemoveImage(words[2]); // 画像を削除する
      GameManager.Instance.mainTextController.GoToTheNextLine();
      break;
    default: //そうでない場合
      break;
  }
}
これで画像が消えるはずです。
終わりに
ということで今回はノベルゲーム開発の第3回ということで画像の表示やレイヤーなどができるようになりました。
それではまた!